Friday, August 29, 2014

Yummy Jif Bars


Joanna and I were looking for a quick, rich treat one night.  While they weren't the cake Jo wanted, they were very well received.


Yummy Jif Bars

(Makes 24 bars)
 As good to eat as they are pretty to look at.  Vary the yield by the size of bars you cut.
 Bar Cookies:
1 c Jif, Creamy or Crunchy
2/3 c butter or margarine, melted
1 t vanilla
2 c light brown sugar
3 eggs
1 c sifted flour
1/2 t salt

Preheat oven to 350 degrees.
Combine Jif and melted butter.  Add vanilla, brown sugar, and eggs and mix well.  Stir in flour and salt.  beat until smooth. 

Spread in greased 13x9x2 pan.  Bake at 350 about 35 minutes or until toothpick inserted in center comes out clean.

Glaze:

3/4 c sifted confectioners sugar
2 t water
1/4 c semisweet chocolate pieces
1 T shortening

In small bowl, stir together confectioners sugar and water until smooth.  Drizzle over warm Jif bars.  In small pan heat chocolate pieces and shortening until melted.  (Be careful not to scorch chocolate.)  Drizzle over the warm Jif bars.

 I liked them more than I thought I would.  They chocolate drizzle wasn't too much and I think the sugar drizzle helped that.  They were gooey and rich and Russell was caught multiple times with a knife cutting chunks out for himself.  These are a quick treat to whip up that will be well received by many.


Saturday, August 23, 2014

Pizza Crust

  We have pizza often at our house.  I always make it, except for very special occasions, because it is cheaper and healthier.  For the crust, I usually use a recipe Sarah gave me years ago-- a recipe that requires no rising.  But I thought I would try this one out.  It's from King Arthur Flour.  Mom loved King Arthur Flour recipes, and after trying this one, I can see why.  It averages five stars from 148 reviews.

It gave me the chance to break out my wheat grinder attachment.  It is awesome!


What a treat—hot homemade pizza, with exactly the toppings you like. And this crust adapts to YOUR schedule: make the dough now, and serve fresh pizza up to 2 days later. Please read this recipe all the way through before starting. It gives you a lot of baking options, and you want to choose the one that best fits your schedule.

Our guarantee: This flavorful pizza crust is crisp when rolled ultra-thin, and chewy when made thick.


  • 2 teaspoons active dry yeast or instant yeast
  • 7/8 to 1 1/8 cups lukewarm water*
  • 2 tablespoons olive oil
  • 3 cups King Arthur Unbleached All-Purpose Flour
  • 1 1/4 teaspoons salt
  • *Use the lesser amount in summer (or in a humid environment), the greater amount in winter (or in a dry climate), and somewhere in between the rest of the year, or if your house is climate controlled.

Directions

1) If you're using active dry yeast, dissolve it, with a pinch of sugar, in 2 tablespoons of the lukewarm water. Let the yeast and water sit at room temperature for 15 minutes, until the mixture has bubbled and expanded. If you're using instant yeast, you can skip this step.
2) Combine the dissolved yeast (or the instant yeast) with the remainder of the ingredients. Mix and knead everything together—by hand, mixer or bread machine set on the dough cycle—till you've made a soft, smooth dough. If you're kneading in a stand mixer, it should take 4 to 5 minutes at second speed, and the dough should barely clean the sides of the bowl, perhaps sticking a bit at the bottom. Don't over-knead the dough; it should hold together, but can still look fairly rough on the surface.
3) To make pizza up to 24 hours later, skip to step 5.
4) To make pizza now: Place the dough in a lightly greased bowl, cover the bowl, and allow it to rise till it's very puffy. This will take about an hour using instant yeast, or 90 minutes using active dry. If it takes longer, that's OK; just give it some extra time.
5) To make pizza later: Allow the dough to rise, covered, for 45 minutes at room temperature. Refrigerate the dough for 4 hours (or for up to 24 hours); it will rise slowly as it chills. This step allows you more schedule flexibility; it also develops the crust's flavor. About 2 to 3 hours before you want to serve pizza, remove the dough from the refrigerator.
6) Decide what size, shape, and thickness of pizza you want to make. This recipe will make one of the following choices:
Two 1/2"-thick 14" round pizzas (pictured);
Two 3/4"-thick 12" round pizzas;
One 3/4" to 1"-thick 13" x 18" rectangular (Sicilian-style) pizza (pictured);
One 1 1/2"-thick 9" x 13" rectangular pizza;
One 1"-thick 14" round pizza.
7) Divide the dough in half, for two pizzas; or leave it whole for one pizza.
8) If you're making a rectangular pizza, shape the dough into a rough oval. For a round pizza, shape it into a rough circle. In either case, don't pat it flat; just stretch it briefly into shape. Allow the dough to rest, covered with an overturned bowl or lightly greased plastic wrap, for 15 minutes.
9) Use vegetable oil pan spray to lightly grease the pan(s) of your choice. Drizzle olive oil into the bottom of the pan(s). The pan spray keeps the pizza from sticking; the olive oil gives the crust great flavor and crunch.
10) Place the dough in the prepared pan(s). Press it over the bottom of the pan, stretching it towards the edges. You'll probably get about two-thirds of the way there before the dough starts shrinking back; walk away for 15 minutes. Cover the dough while you're away, so it doesn't dry out.
11) When you come back, you should be able to pat the dough closer to the corners of the pan. Repeat the rest and dough-stretch one more time, if necessary; your goal is to get the dough to fill the pan as fully as possible.
12) Allow the dough to rise, covered, till it's noticeably puffy, about 90 minutes (if it hasn't been refrigerated); or 2 to 2 1/2 hours (if it's been refrigerated). Towards the end of the rising time, preheat the oven to 450°F.
13) Bake the pizza on the lower oven rack till it looks and feels set on top, and is just beginning to brown around the edge of the crust, but is still pale on top. This will take about 8 minutes for thinner crust pizza; about 10 to 12 minutes for medium thickness; and 12 to 14 minutes for thick-crust pizza. If you're baking two pizzas, reverse them in the oven (top to bottom, bottom to top) midway through the baking period.
14) To serve pizza immediately: Remove it from the oven, and arrange your toppings of choice on top. Return to the oven, and bake on the upper oven rack for an additional 10 to 15 minutes, until the crust is nicely browned, both top and bottom, and the cheese is melted. Check it midway through, and move it to the bottom rack if the top is browning too much, or the bottom not enough.
15) To serve pizza up to 2 days later: Remove the untopped, partially baked crust from the oven, cool completely on a rack, wrap in plastic, and store at room temperature. When ready to serve, top and bake in a preheated 450°F oven, adding a couple of minutes to the baking times noted above. Your goal is a pizza whose crust is browned, and whose toppings are hot/melted.
16) Remove the pizza from the oven, and transfer it from the pan to a rack to cool slightly before serving. For easiest serving, cut with a pair of scissors.


This was definitely a favorite at our house.  The only downside is the rising time.  We loved the flavor and the texture.  I made it whole wheat and I could hardly tell in the pizza.  I will definitely make it again, but I might make a big batch and freeze some so I only have to go through all that rising time once.


Recipe summary

Hands-on time:
20 mins.
Baking time:
18 mins. to 30 mins.
Total time:
3 hrs 8 mins.
Yield:
1 or 2 standard round pizzas, or 1 large rectangular pizza, about 12 servings

Tips from our bakers

  • Make pizza any shape or size or thickness you like; the above guidelines are simply suggestions. Understand that the thickest-crust pizza will need to bake longer than the thinnest-crust version.
  • To freeze partially baked pizza crust: Bake crust as directed in step 13. Remove from the oven, cool to room temperature, wrap well, and freeze for up to 3 months. When you're ready to serve pizza, remove the crust from the freezer, and allow it to thaw, loosely wrapped, at room temperature. Once it's completely thawed, complete pizza by starting at step 15 above.
  • What else can you to with this tasty crust? How about fresh, hot cheese stuffed bread sticks? Our step by step blog will show you what pitfalls to avoid on your way to these pizza shop favorites.

Thursday, August 21, 2014

Blueberry Streusel Muffins

This recipe comes from a website that apparently no longer exists because I hoped to find it so I wouldn't have to type the entire recipe in by hand. No such luck.

Prep time: 15 minutes
Baking time: 30 minutes
Makes 6 jumbo or 12 regular muffins

Ingredients
For the muffins
3 c. fresh blueberries, divided
2 1/4 c. all purpose flour
1 tbsp baking powder
1/2 tsp salt
1/4 tsp ground nutmeg
3/4 c butter at room temp
1 c granulated sugar
2 large eggs
2 tsp vanilla extract
1 container (8 oz) lemon yogurt

For the Streusel
1/2 c all purpose flour
1/3 c packed brown sugar
1/4 c butter

Directions
1. Preheat the oven to 400 degrees. Grease 6 jumbo or 12 regular muffin tins. Wash and dry the blueberries. In a medium bowl, mix the flour, baking powder, salt and nutmeg.

2. Using an electric mixer on high speed, beat thhe butter and granulated sugar. Add the eggs, one at a time, beating after adding each. Add the vanilla; beat until fluffy. Stir in half of the flour mixture and then the yogurt. Stir in the remaining flour; fold in 2 1/2 c. blueberries.

3. To prepare streusel topping, in a medium bowl, combine the flour and brown sugar. Using two knives, cut the butter into the flour and sugar until mixture resembles coarse crumbs.

4. Fill the muffin cups half-full with batter. Sprinkle the muffins with half the streusel. Top with the remaining batter; sprinkle with the remaining streusel. Sprinkle the muffins with the remaining 1/2 cup berries; bake for 10 minutes. Reduce heat to 375 degrees and bake jumbo muffins 20 minutes longer (bake regular muffins 10 minutes longer), or until a toothpick comes out clean. Cool muffins in the pan for at least 10 minutes.

I thought these muffins were just fine and nothing spectacular. Big Chubb loved them, and I can't remember how the Little Chubb felt about them. We only had Greek yogurt when I made them and so the muffins had a very distinct Greek yogurt taste. And, I felt they were a little too moist. But, that was what Big Chubb liked about them.

Monday, August 18, 2014

Wheat-Flour Tortillas

I've tried posting this recipe three different times, but I couldn't find the card the recipe was written on, then I couldn't find the picture I took. Here it finally is. I was really excited about these because I like whole wheat tortillas. I was a little sad when I finally started making the recipe because it wasn't for whole wheat tortillas; it was for wheat tortillas using white flour, as opposed to corn tortillas. I used some whole wheat flour anyway.

6 c all-purpose flour
1 t baking powder
2 t salt
1 heaping c. shortening
2 c. warm water, or a little more

Mix dry ingredients, work in shortening with hands until consistency of oatmeal, then pour in lukewarm water all at once. Mix well and knead 2-3 minutes. Coat with a little oil and put into a plastic bag for 20 minutes.

Take a large piece of dough and squeeze out a portion the size of a ping-pong ball. Roll in hands til smooth. Flatten ball slightly, then roll with a pin to size of a saucer.

Cook on hot griddle til cooked thru and golden brown.

They were good, but probably not worth the effort. I had a very hard time getting them thin, and many of them ended up crispy around the edges. I heard Mom say once that she had tried making homemade tortillas (probably this recipe) a few times, and decided it wasn't worth it. I agree. It's cheap, but I can usually buy a package of 10 tortillas for under $1 anyway.


Thursday, July 31, 2014

Squash Spice Cake

I have this recipe twice. Apparently someone else thought it was good. I have a little booklet called "How to eat all the squash you'll grow with just one packet of Daytona. Hybrid Summer Crookneck Squash". This recipe came from it and was also handwritten by Mom on a sheet of notebook paper. I was really excited to make all the recipes in the little booklet, but we haven't gotten a single squash from our one squash plant. All the little squashes would wither away once they got about an inch and a half long. We finally have one that made it past that size, but now the plant, along with the winter squash plants, is getting powdery mildew. What a bummer.

Brian's parent shared some yellow squash with us. In an attempt to use it before we went to the family reunion I made this cake, then froze it. It is delicious.

Squash Spice Cake

1/2 c butter, softened
1 c sugar
1 egg
2 c grated summer squash (about 3/4 lb.)
1/2 c applesauce
1/4 c orange juice
2 1/2 c all-purpose flour
1 1/2 t baking powder
1 1/2 t baking soda
1 t cinnamon
1/2 t ground cloves
1/2 t nutmeg
1/2 c chopped walnuts
1/2 c chopped raisins
Cream cheese frosting

Cream butter and sugar until light and fluffy. Add egg. squash, applesauce and orange juice. Beat well. Combine flour, baking powder, soda, cinnamon, cloves and nutmeg. Gradually add to squash mixture,blending well. Stir in walnuts and raisins. Pour into a greased 9 x 13-inch baking pan. Bake in a 350 degree F. oven for 45 minutes. Cool. Frost with cream cheese frosting or sprinkle with sifted confectioners' sugar.

I loved this cake. It has a similar taste to carrot cake. I omitted the raisins and nuts, though I'm sure they would be good in it. I didn't have orange juice, but I did have about 1/4 c mandarin oranges sitting in the fridge, so they got blended in. I frosted it with a whipped cream cream cheese frosting, and it went well with the cake. Janet and Jacob visited while this cake was still around, and they both liked it, too. This is a winner.

Wednesday, July 23, 2014

Granola

This is another Tonya Campbell recipe, #6092.

4 c uncooked oatmeal
1 1/2 c wheat germ
1 c grated coconut
1/4 c powdered milk
1 T cinnamon
1 T brown sugar
1/3 c vegetable oil
1/2 c honey
1 T vanilla

Mix dry ingredients. Warm oil, honey and vanilla. Pour over dry ingredients and stir until coated. Bake on cookie sheet at 250 degrees for 1 hour or 300 degrees for 1/2 hour. Turn frequently. OPTIONAL: Sesame seeds, nuts, bran, etc. Be creative!! Add dry fruit after baking. Enjoy!

I substituted ground flax for the wheat germ. I can't seem to find wheat germ at my favorite grocery stores. I really like the taste of this granola, but it didn't get clumpy like granola should. I realized a few days after making it that I only put in 1/4 c honey. That probably had something to do with it. We all really like granola, so I'll probably make it again and see if the extra honey helps hold things together better. Maybe I'll up the brown sugar too, because that seems like it would help things stick as well.

Monday, July 14, 2014

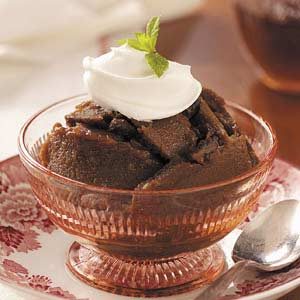
Gingerbread Pudding Cake (Slow Cooker)

This is a Taste of Home recipe that I have had my eye on for awhile because it is a pudding cake and it is a slow cooker recipe. I thought it would be a win, win recipe, but it wasn't.

Gingerbread Pudding Cake

Ingredients
Photo from Taste of Home
1/4 cup butter, softened
  1/4 cup sugar
  1 egg white
  1 teaspoon vanilla extract
  1/2 cup molasses
  1 cup water
  1-1/4 cups all-purpose flour
  3/4 teaspoon baking soda
  1/2 teaspoon ground cinnamon
  1/2 teaspoon ground ginger
  1/4 teaspoon salt
  1/4 teaspoon ground allspice
  1/8 teaspoon ground nutmeg
  1/2 cup chopped pecans
  TOPPING:
  6 tablespoons brown sugar
  3/4 cup hot water
  2/3 cup butter, melted

Directions
In a large bowl, cream butter and sugar until light and fluffy. Beat in egg white and vanilla. Combine molasses and water. Combine the flour, baking soda, cinnamon, ginger, salt, allspice and nutmeg; gradually add to creamed mixture alternately with molasses mixture, beating well after each addition. Fold in pecans.
Pour into a greased 3-qt. slow cooker. Sprinkle with brown sugar. Combine hot water and butter; pour over batter (do not stir).
Cover and cook on high for 2 to 2-1/2 hours or until a toothpick inserted near center of cake comes out clean. Turn off heat. Let stand for 15 minutes. Serve warm. Yield: 6-8 servings.

So, usually with pudding cakes, you put the hot water on top, and it magically bakes up a cake in pudding. This ended up being a weird gelatinous cake, reminiscent of the strawberry bread I made once, and no pudding. The taste was very rich, most likely due to the abundance of butter. I don't recommend this recipe, but it for some reason you feel compelled to make it, cut back the amount of butter in the topping. I also didn't take my own picture because pudding cakes generally look like a gloppy mess, and this one wasn't any better.