One Friday night I decided to make on of the many pizza dough recipes I have. Big Chubb is very particular about his pizza dough, so we have tried out a lot of recipes. We haven't really found a go-to one, so it was worth it to try this one out.
3 cups all-purpose flour
1 package active dry yeast
2 tablespoons vegetable oil
1 teaspoon salt
1 tablespoon white sugar
1 cup warm water
Directions
1. Combine flour, salt, sugar, and yeast in a large bowl. Mix in oil and warm water. Spread out on a large pizza pan. Top as desired.
2. Bake at 375 degrees for 20-25 minutes. (I just noticed that the directions originally say celsius instead of farenheit. That would be one crispy crust!)
It was okay. We always cook our pizza at a higher temperature (not 375 C, though), so I thought the crust was only so so. Big Chubb said it was good, but I thought it was just bready.
Showing posts with label pizza. Show all posts
Showing posts with label pizza. Show all posts
Friday, November 20, 2015
Thursday, September 10, 2015
Bread Machine Calzone
I warned Big Chubb that I was going to mix up our usual Friday night pizza and make this calzone instead.
1 1/4 cups water
2 teaspoons active dry yeast
1 1/2 tablespoons white sugar
3 cups bread flour
1 teaspoon salt
1 teaspoon powdered milk
3/4 cup sliced Italian sausage
3/4 cup pizza sauce
1 1/4 cups shredded mozzarella cheese
2 tablespoons butter, melted
Directions
1. To make dough: place water yeast, sugar, flour, salt and powdered milk in the pan of a bread machine, in the order suggested by the manufacturer. Select dough cycle. After cycle is completed, roll out dough on a lightly floured surface.
2. Meanwhile, brown sausage for about 8 to 10 minutes in a large skillet over medium heat. Drain excess fat and reserve.
3. Preheat oven to 350 degrees F.
4. Shape dough into a 16 inch by 10 inch rectangle. Transfer to a lightly greased cookie sheet, and spoon pizza sauce lengthwise down the center of the dough, followed by the browned sausage and the cheese. make diagonal cuts 1 1/2 inch apart down each long side of the dough rectangle, cutting to within 1/2 inch of the filling. Criss-cross water. Brush top of calzone with melted butter.
5. Bake at 350 degrees F for 35 to 40 minutes, or until golden brown. Remove from oven and cool for 5 minutes, then slice and serve.
I was confused by the sliced Italian sausage that needed browning. We had it with just pepperoni inside. There was a lot of bread to the filling.
Big Chubb and I liked it enough, but it was quite a bit of work for pizza. Little Chubb and Baby Chubb didn't care for it, and complained about eating it with no sauce. I will probably keep to regular pizza for our Friday Night Pizza.
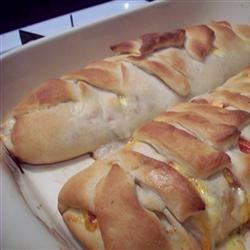 |
| Thanks allrecipes for the picture! |
2 teaspoons active dry yeast
1 1/2 tablespoons white sugar
3 cups bread flour
1 teaspoon salt
1 teaspoon powdered milk
3/4 cup sliced Italian sausage
3/4 cup pizza sauce
1 1/4 cups shredded mozzarella cheese
2 tablespoons butter, melted
Directions
1. To make dough: place water yeast, sugar, flour, salt and powdered milk in the pan of a bread machine, in the order suggested by the manufacturer. Select dough cycle. After cycle is completed, roll out dough on a lightly floured surface.
2. Meanwhile, brown sausage for about 8 to 10 minutes in a large skillet over medium heat. Drain excess fat and reserve.
3. Preheat oven to 350 degrees F.
4. Shape dough into a 16 inch by 10 inch rectangle. Transfer to a lightly greased cookie sheet, and spoon pizza sauce lengthwise down the center of the dough, followed by the browned sausage and the cheese. make diagonal cuts 1 1/2 inch apart down each long side of the dough rectangle, cutting to within 1/2 inch of the filling. Criss-cross water. Brush top of calzone with melted butter.
5. Bake at 350 degrees F for 35 to 40 minutes, or until golden brown. Remove from oven and cool for 5 minutes, then slice and serve.
I was confused by the sliced Italian sausage that needed browning. We had it with just pepperoni inside. There was a lot of bread to the filling.
Big Chubb and I liked it enough, but it was quite a bit of work for pizza. Little Chubb and Baby Chubb didn't care for it, and complained about eating it with no sauce. I will probably keep to regular pizza for our Friday Night Pizza.
Friday, May 8, 2015
Upside Down Pizza
We have pizza every Friday night to make life easy for me when it comes to menu planning. I decided to make this to switch up the routine slightly. Big Chubb told me to never switch it again without giving him warning. He was disappointed that we weren't having actual pizza.
Upside Down Pizza
 1 lb. ground beef
1 c. onions, chopped
1 c. green bell pepper, chopped
1 cn. pizza sauce 15 oz.
1/4 lb. pepperoni, coarsely chopped
1/2 ts Italian seasoning, dried
1 jar sliced mushrooms, drained, 2.5 oz
6 oz mozzarella cheese, thinly sliced
Topping
1 c. milk
1 tb oil
2 eggs
1 c. all purpose flour
1/4 ts salt
1/4 c. Parmesan cheese grated
Heat oven to 400F. In lrg. skillet over med.-high heat, brown ground beef, onions, and bell pepper. Drain. Stir in pizza sauce, pepperoni, Italian seasoning and mushrooms (I added olives because if we were to ever have any sort of pizza anything without olives there would be a major uprising in our house). Bring to a boil. Reduce heat to low; simmer uncovered 10 minutes., stirring occasionally. meanwhile, in sm. bowl combine milk, oil and eggs; beat one minute. at med. speed. Lightly spoon flour into measuring cup; level off. Add flour and salt; beat 2 mins. at med. speed or until smooth. Spoon meat mixture evenly into ungreased 13x9" baking dish. Place cheese slices over hot mixture. Pour topping evenly over cheese, covering complete; sprinkle with Parmesan cheese. Bake at 400F for 20-30 mins. or until puffed and deep golden brown. Makes 6-8 servings. "
"It's fun to watch the 'crust' rise while this unique casserole is baking. The secret to the tender crust is following the recipe directions carefully and using the pan size called for."

I liked it enough. Our frozen green peppers are getting to taste like freezer, so it detracted from the flavor slightly. I also used ground turkey because beef is not priced right to be in our food budget. It got good enough reviews to be considered for future meals. Big Chubb said it was ok, but they would never have anything like this in Italy. Baby Chubb loved it like she loves most food these days. Little Chubbs didn't want to eat it because he saw steam coming from it.
Upside Down Pizza
 1 lb. ground beef
1 c. onions, chopped
1 c. green bell pepper, chopped
1 cn. pizza sauce 15 oz.
1/4 lb. pepperoni, coarsely chopped
1/2 ts Italian seasoning, dried
1 jar sliced mushrooms, drained, 2.5 oz
6 oz mozzarella cheese, thinly sliced
Topping
1 c. milk
1 tb oil
2 eggs
1 c. all purpose flour
1/4 ts salt
1/4 c. Parmesan cheese grated
Heat oven to 400F. In lrg. skillet over med.-high heat, brown ground beef, onions, and bell pepper. Drain. Stir in pizza sauce, pepperoni, Italian seasoning and mushrooms (I added olives because if we were to ever have any sort of pizza anything without olives there would be a major uprising in our house). Bring to a boil. Reduce heat to low; simmer uncovered 10 minutes., stirring occasionally. meanwhile, in sm. bowl combine milk, oil and eggs; beat one minute. at med. speed. Lightly spoon flour into measuring cup; level off. Add flour and salt; beat 2 mins. at med. speed or until smooth. Spoon meat mixture evenly into ungreased 13x9" baking dish. Place cheese slices over hot mixture. Pour topping evenly over cheese, covering complete; sprinkle with Parmesan cheese. Bake at 400F for 20-30 mins. or until puffed and deep golden brown. Makes 6-8 servings. "
"It's fun to watch the 'crust' rise while this unique casserole is baking. The secret to the tender crust is following the recipe directions carefully and using the pan size called for."

I liked it enough. Our frozen green peppers are getting to taste like freezer, so it detracted from the flavor slightly. I also used ground turkey because beef is not priced right to be in our food budget. It got good enough reviews to be considered for future meals. Big Chubb said it was ok, but they would never have anything like this in Italy. Baby Chubb loved it like she loves most food these days. Little Chubbs didn't want to eat it because he saw steam coming from it.
Wednesday, April 22, 2015
Veggie Pizza
Veggie Pizza
1 can crescent rolls
 4 oz soft cream cheese
1/3 packet Hidden Valley Ranch
1 T mayonnaise
Raw veggies (broccoli, green pepper, radishes, cucumbers, mushrooms, celery, carrots, olives, purple cabbage, etc.)
4 oz. shredded mozzarella cheese
1/4 c crushed pineapple
1) Unroll can of rolls onto cookie sheet.
2) Bake for 1/2 of package time.
3) While baking mix cream cheese, ranch dressing and mayo. Chop veggies into small pieces.
4) Remove rolls, spread cheese mixture over on top of hot crust. Sprinkle on veggies, pineapple, and cheese.
5) Return to oven for remainder of baking time or until veggies are done and cheese melts.
6) Cut into pieces while hot.
I've made normal veggie pizza before, but I wanted to try this because you cook the pizza after you put the toppings on, and it calls for pineapple. It was good, but baking it with the toppings on didn't really do much since it only ended up being about 5 minutes. They were still pretty much raw, but I was afraid the crust would get overdone if I left it in there longer. The pineapple was a good addition. The mozzarella just kind of disappeared. When I make it again, I'll just make it the normal way, maybe with pineapple.
Saturday, August 23, 2014
Pizza Crust
We have pizza often at our house. I always make it, except for very
special occasions, because it is cheaper and healthier. For the crust, I
usually use a recipe Sarah gave me years ago-- a recipe that requires
no rising. But I thought I would try this one out. It's from King
Arthur Flour. Mom loved King Arthur Flour recipes, and after trying
this one, I can see why. It averages five stars from 148 reviews.
 |
| It gave me the chance to break out my wheat grinder attachment. It is awesome! |
Pizza Crust |
| What a treat—hot homemade pizza, with exactly the
toppings you like. And this crust adapts to YOUR schedule: make the
dough now, and serve fresh pizza up to 2 days later. Please read this
recipe all the way through before starting. It gives you a lot of baking
options, and you want to choose the one that best fits your schedule. Our guarantee: This flavorful pizza crust is crisp when rolled ultra-thin, and chewy when made thick.
Directions
|
.jpg)

Monday, February 24, 2014
Pizza Buns
I thought this would be a good quick meal for us when I had to switch things around last minute due to Ben's busy schedule.
Pizza Buns
½ lb. ground beef
4 buns, sliced in half
butter or margarine
1 small can or jar of pizza sauce
shredded or sliced cheese
(mozzarella or parmesan cheese works well)
Brown meat. Drain the fat off the cooked meat. Lightly
butter each half of buns. Spread each half of the bun
with 1 tablespoon pizza sauce and top with cooked
meat. Grate cheese and put some on top if desired.
(Add mushrooms, onion, green pepper or other toppings
for variety.) Bake in oven at 375 degrees until hot and
cheese is melted (about 15 minutes).
Serves four. Per serving: 280 calories, 27 g carbohydrate,
10 g fat, 3 g fiber and 560 mg sodium
I did not like them. The buns were soggy under all the toppings, and I even used somewhat stale buns we had sitting around. Big Chubb however, liked them and ate the last one that I couldn't get down. I did add extra toppings because we had some in the fridge to use up, plus Little Chubb really likes it when there are olives to eat, so that is about all that he ate off of his little pizza bun.
Sorry I took no pictures of them. I was grossed out by the sogginess of the bun underneath and spent quite a bit of the evening trying to recover from gagging them down.
Pizza Buns
½ lb. ground beef
4 buns, sliced in half
butter or margarine
1 small can or jar of pizza sauce
shredded or sliced cheese
(mozzarella or parmesan cheese works well)
Brown meat. Drain the fat off the cooked meat. Lightly
butter each half of buns. Spread each half of the bun
with 1 tablespoon pizza sauce and top with cooked
meat. Grate cheese and put some on top if desired.
(Add mushrooms, onion, green pepper or other toppings
for variety.) Bake in oven at 375 degrees until hot and
cheese is melted (about 15 minutes).
Serves four. Per serving: 280 calories, 27 g carbohydrate,
10 g fat, 3 g fiber and 560 mg sodium
I did not like them. The buns were soggy under all the toppings, and I even used somewhat stale buns we had sitting around. Big Chubb however, liked them and ate the last one that I couldn't get down. I did add extra toppings because we had some in the fridge to use up, plus Little Chubb really likes it when there are olives to eat, so that is about all that he ate off of his little pizza bun.
Sorry I took no pictures of them. I was grossed out by the sogginess of the bun underneath and spent quite a bit of the evening trying to recover from gagging them down.
Sunday, December 29, 2013
Fondue For You
 I volunteered to cook meals for Christmas Day. Since we usually have the big meal on Christmas Eve, Christmas Day was wide open for any food I pleased. For my wellness challenge, I was supposed to eat three meals a day (harder than it seems if you're pregnant), so this also helped me to be sure to eat meals.
For breakfast I made a non-Cupboard Project recipe that was very good (http://www.foodnetwork.com/recipes/rachael-ray/the-ultimate-breakfast-for-dinner-sausage-and-spinach-egg-strata-recipe/index.html) along with fruit soup. Yum! They were great, and there were leftovers for the next morning. I thought about making cinnamon rolls or French toast, but it was for Christmas morning, when I generally gorge on candy and sweets. This was a nice alternative.
For dinner I made two fondue recipes from a Taste of Home magazine. It made a nice easy-to-eat meal for a group.
 Pizza Fondue
TOTAL TIME: Prep/Total Time: 25 min.
MAKES: 22 servings
Ingredients
1/2 pound ground beef
1 cup chopped fresh mushrooms
1 medium onion, chopped
1 garlic clove, minced
1 tablespoon cornstarch
1-1/2 teaspoons fennel seed
1-1/2 teaspoons dried oregano
1/4 teaspoon garlic powder
2 cans (15 ounces each) pizza sauce
2-1/2 cups (10 ounces) shredded cheddar cheese
1 cup (4 ounces) shredded part-skim mozzarella cheese
2 tablespoons chopped ripe olives
Breadsticks, bagel chips, baked pita chips and/or tortilla chips
Nutritional Facts
1/4 cup (calculated without breadsticks, bagel chips, baked pita chips or tortilla chips) equals 97 calories, 6 g fat (4 g saturated fat), 23 mg cholesterol, 222 mg sodium, 4 g carbohydrate, 1 g fiber, 7 g protein.
Directions
In a large skillet, cook the beef, mushrooms and onion over medium heat until meat is no longer pink. Add garlic; cook 1 minute longer. Drain. Stir in the cornstarch, fennel, oregano and garlic powder until blended. Stir in pizza sauce.
Bring to a boil; cook and stir for 1-2 minutes or until thickened. Gradually stir in cheeses until melted. Stir in olives. Keep warm.
Serve with breadsticks, bagel chips, pita chips and/or tortilla chips. Yield: 5-1/2 cups.
Originally published as Pizza Fondue in Taste of Home December/January 2008, p49
For this one, we decided to leave out the meat since we had already eaten meat at like every meal. I made some breadsticks to go along with this, and it really did taste like pizza when you dipped a breadstick in the dip. I think it was too hot when I put the cheese in because some of the cheddar cheese cooked instead of melted. It still tasted good.
 Super Sausage Dip
TOTAL TIME: Prep: 15 min. Cook: 35 min.
MAKES: 40 servings
Ingredients
1 pound bulk pork sausage
1 small onion, chopped
1/2 cup chopped green pepper
3 medium tomatoes, chopped
1 can (4 ounces) chopped green chilies
1 package (8 ounces) PHILADELPHIA® Cream Cheese, cubed
2 cups (16 ounces) sour cream
Tortilla chips
Directions
In a large skillet, cook the sausage, onion and green pepper over medium heat until meat is no longer pink; drain.
Stir in tomatoes and chilies. Bring to a boil. Reduce heat; simmer, uncovered, for 30 minutes, stirring occasionally.
Add cream cheese; stir until melted. Stir in sour cream; heat through. (Do not boil.) Transfer to a fondue pot and keep warm. Serve with chips. Yield: 5 cups.
Originally published as Super Sausage Dip in Taste of Home December/January 2008, p49
I think most people liked this one better. At least, more of it was gone. We had tortilla chips and pita chips to dip (and the breadsticks). Dad also liked this dip cold.
Monday, March 4, 2013
Grilled Asparagus Stromboli from King Arthur Flour
Saturday night we had this one for dinner before we headed to Stake Conference. It was pretty easy to make since the bread machine did the hard part. I roasted the vegetables in the oven. Big Chub liked it. Little Chub ate it. I thought it was fine. Next time, I'll definitely salt and pepper the vegetables more and maybe add some Parmesan cheese in with the mozzarella.


The dough was amazing! I'll definitely use it for all our future pizzas.


The dough was amazing! I'll definitely use it for all our future pizzas.
Stromboli dough
- 2 teaspoons instant yeast
- 7/8 to 1 1/8 cups warm water
- 2 tablespoons garlic oil (or olive oil)
- 3 cups King Arthur Unbleached All Purpose flour
- 1 tablespoon Pizza dough flavor (optional but good)
- 1 1/4 teaspoons salt
Grilled Asparagus & Onion Filling
- 2 cups fresh asparagus
- 1 large onion, roughly chopped
- 1 cup shredded cheese (mozzarella, provolone, or a blend)
- garlic oil or olive oil for brushing crust
Subscribe to:
Posts (Atom)